Our Ceiling Damage Repair Approach
Leak Source Tracing
We identify and stop the source above the ceiling — not just patch the stain. No repair starts until the water is no longer coming in.
Structural Drying Before Repair
Framing and the surrounding cavity are dried to verified standards using air movers and dehumidifiers. We do not close up wet structure.
Mold Check in Ceiling Cavity
While the cavity is open we inspect all exposed surfaces for mold — the one time it can be addressed without tearing the ceiling out again later.
Texture Matching
Knockdown, orange peel, smooth, skip trowel — we replicate the existing ceiling pattern so the repair blends, not patches.
What Causes Ceiling Water Damage in Austin Homes
Ceiling water damage always starts above the ceiling surface. The most common causes in Austin residential properties include:
- Plumbing leaks from above. If there is a bathroom, kitchen, or laundry room above the affected ceiling, supply line connections, drain fittings, toilet wax rings, and shower pan failures are the most frequent culprits. Even a slow drip can saturate ceiling drywall and insulation over time.
- Water heater failures. Many Austin homes have water heaters in attic spaces or second-floor utility closets. A tank failure or pressure relief valve discharge sends water directly onto the ceiling structure below.
- HVAC condensation. Air handlers in attic spaces produce condensation. A clogged condensate drain line, a cracked drain pan, or poorly insulated ductwork can drip onto ceiling drywall for days or weeks before the stain becomes visible from below.
- Roof leaks. Damaged flashing, missing shingles, or deteriorated boot seals around roof penetrations allow rainwater into the attic space. In Austin, where sudden heavy downpours are common, even small roof vulnerabilities can produce significant water intrusion during a storm.
- Ice dam effects. While less common in Austin than in northern climates, rare freezing events can cause ice buildup in gutters and at roof edges, forcing water under shingles and into the attic.
Identifying the exact source matters because it determines both the repair scope and whether your homeowner's insurance will cover the damage. Sudden plumbing failures are typically covered; gradual roof deterioration often is not.
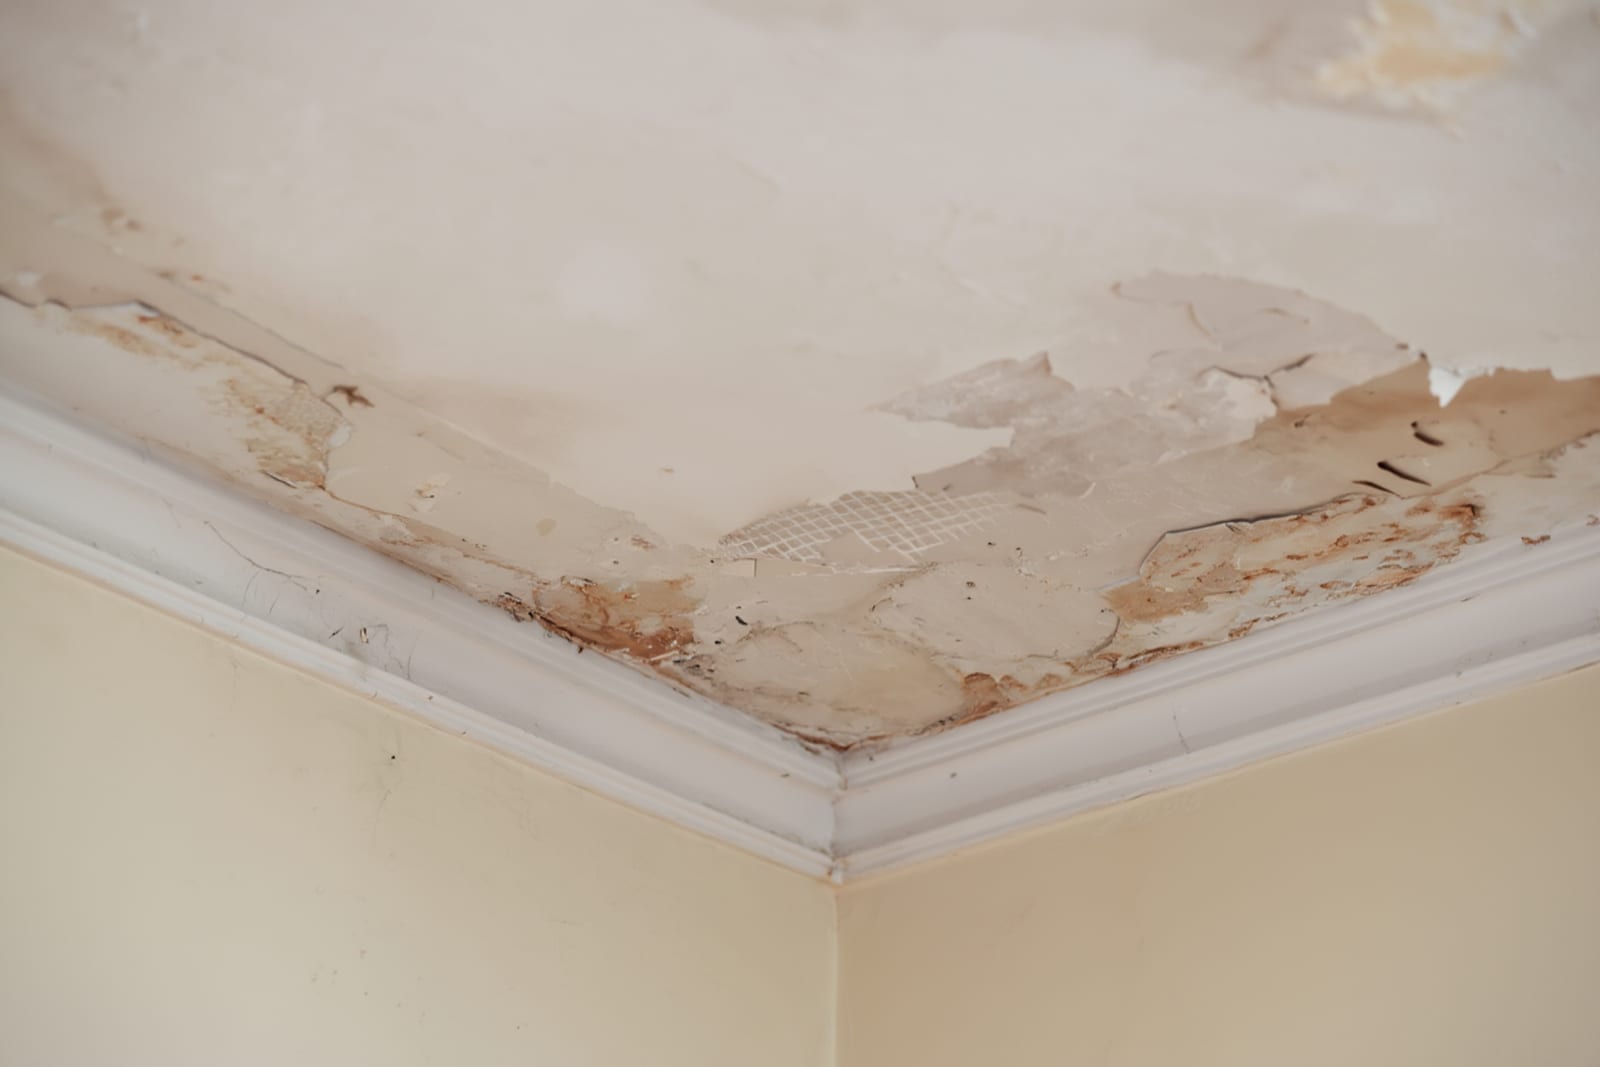
How to Assess the Extent of Ceiling Damage
What you see from below — a brown stain, a damp spot, a bubble in the paint — represents only the surface. The actual damage often extends further than the visible indicators suggest.
During our assessment, we evaluate the ceiling from both sides. From below, we check for softness, sagging, discoloration extent, and any signs of active moisture. From above (in the attic or the room above), we inspect the top side of the drywall, the insulation, the framing, and any plumbing or HVAC components that could be the source.
Moisture meters are critical for ceiling assessment. A non-invasive meter pressed against the ceiling surface tells us whether the drywall is still wet and how far the moisture has spread beyond the visible stain. In many cases, the wet area is 30 to 50 percent larger than the stain itself, because water travels along the top surface of the drywall before soaking through to become visible.
Thermal imaging from below can also reveal the moisture footprint in the ceiling — wet areas appear as cooler zones on the thermal camera, even when the surface looks dry to the eye.
Ceiling Water Damage? Call for a Full Assessment.
We find the source, assess the structural damage, and provide a written repair scope — before any work begins.
Can You Fix Ceiling Water Damage Yourself?
Minor cosmetic damage — a small stain from a leak that has been repaired and fully dried — can sometimes be addressed with a stain-blocking primer and repaint. But there are important limitations to DIY ceiling repair:
- You cannot verify drying from the surface alone. Ceiling drywall and the insulation above it may still be wet even when the surface feels dry. Without moisture meters, you risk painting over a damp surface that will develop mold.
- Texture matching is difficult. Austin homes feature various ceiling textures — knockdown, orange peel, popcorn, smooth, skip trowel. Matching these textures seamlessly requires experience and the right equipment.
- Structural assessment requires attic access. If the water came from above, someone needs to go up there and verify that the framing, insulation, and any mechanical systems are in good condition.
- Mold risk is real. The dark, unventilated space above a ceiling is one of the most common locations for hidden mold growth after water damage. Painting over the surface without checking above it leaves this risk unaddressed.
If the leak source is unknown, the damage covers more than a few square feet, or the ceiling was wet for more than 24 hours, professional assessment is the safer choice. The cost of an assessment is small compared to the cost of mold remediation if hidden growth is discovered later.
The Professional Ceiling Repair Process
Our ceiling water damage repair process follows a specific sequence designed to address the damage completely — not just cosmetically:
Source Identification and Repair
Before touching the ceiling, we identify and stop the water source. There is no point repairing drywall if the leak above it continues. This may involve coordinating with a plumber, roofer, or HVAC technician depending on the source.
Moisture Mapping
We measure moisture content across the ceiling and in the cavity above to determine the full extent of saturation. This defines the work area.
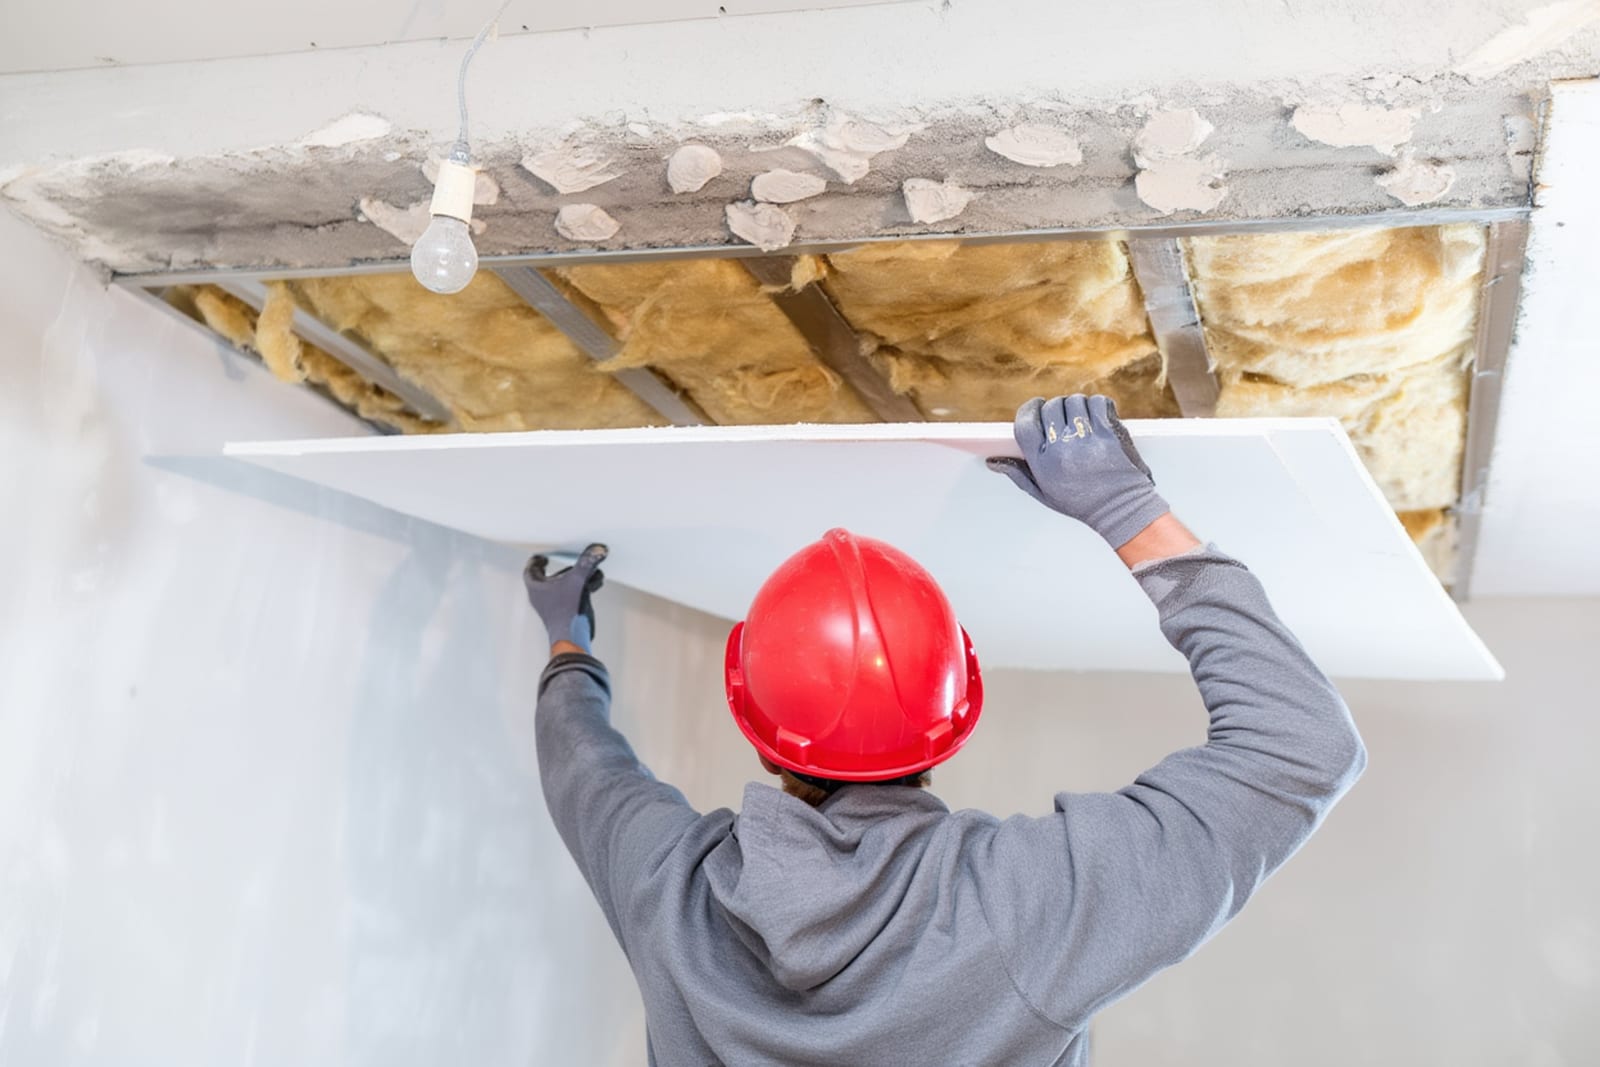
Controlled Demolition
Saturated drywall and wet insulation are carefully removed. We contain the work area to prevent debris and any potential mold spores from spreading to other rooms. Framing lumber is inspected for water damage and mold.
Structural Drying
Using air movers and dehumidifiers, we dry the exposed framing, subfloor (if second-story), and surrounding materials to verified dry standards. This phase typically takes 2 to 4 days. Learn more about our drying process.
Mold Inspection
Before closing the ceiling back up, we inspect all exposed surfaces for mold and treat any contamination found. Mold behind a freshly repaired ceiling will continue to grow and eventually become a larger problem.
Insulation Replacement
Wet insulation loses its R-value and does not recover when dried. We replace affected insulation with new material of the same type and rating.
Drywall, Taping and Finishing
New drywall is hung, taped, mudded, and sanded. Multiple coats of joint compound are applied for a seamless finish.
Texture Matching and Painting
The repaired area is textured to match the existing ceiling pattern, primed with a stain-blocking primer, and painted to blend with the surrounding surface.
Drywall, Texture and Paint Matching
The final appearance of a ceiling repair is what you live with every day, so getting the finish right matters. Texture and paint matching is the part of ceiling repair that separates a professional result from an obvious patch job.
Texture matching requires identifying the existing pattern and replicating it on the new drywall. Common ceiling textures in Austin homes include knockdown (a popular choice in newer construction), orange peel, skip trowel, and smooth finish. Older homes may have popcorn or acoustic texture, which requires different application techniques. We test the texture on a sample board before applying it to your ceiling to verify the match.
Paint matching can be tricky with ceilings because existing paint has faded or yellowed over time. We use color-matching technology to get as close as possible, and in many cases we repaint the entire ceiling plane (wall-to-wall) rather than just the repaired area. This eliminates visible color differences that would otherwise make the repair obvious.
Checking for Mold Behind the Ceiling
The cavity above a water-damaged ceiling is one of the highest-risk areas for hidden mold growth in any home. The conditions are ideal: sustained moisture, organic materials (drywall paper, wood framing, cellulose insulation), darkness, and no air circulation.
During every ceiling water damage repair, we inspect the exposed cavity for mold before installing new materials. This includes visual inspection under work lights, moisture readings on framing and subfloor, and surface sampling when suspicious discoloration is found.
If mold is present, we remediate it as part of the repair project — treating affected framing with antimicrobial agents, HEPA vacuuming all surfaces, and verifying clearance before closing the ceiling back up. Addressing mold at this stage, while the cavity is already open, is far simpler and less expensive than discovering it after the ceiling has been repaired.
Preventing Future Ceiling Water Damage
After repairing ceiling damage, several preventive measures reduce the risk of recurrence:
- Inspect plumbing connections annually. Check supply lines, drain fittings, and appliance connections in rooms above finished ceilings. Replace rubber washing machine hoses with braided stainless steel.
- Maintain your HVAC condensate line. Have the line flushed during annual AC maintenance. Consider adding a secondary drain pan with a float switch under attic-mounted air handlers.
- Address roof maintenance promptly. Repair damaged shingles, deteriorated flashing, and failed boot seals before they allow water intrusion during Austin's intense rain events.
- Install water leak detection sensors. Battery-operated sensors placed near water heaters, under washing machines, and beneath bathroom fixtures provide early warning of leaks before they reach the ceiling below.
Frequently Asked Questions
Ceiling Water Damage Repair — Service Areas
We provide ceiling water damage repair throughout the greater Austin metro area, including: Round Rock · Cedar Park · Georgetown · Pflugerville · Kyle · Buda · San Marcos · Leander · Lakeway. Contact us for service in your area.


